Andrew's Blog

Random Thoughts of an ASP.Net Code Monkey

Scheduling a Webjob on Windows Azure Pack Websites V2 Update Rollup 9

March 12, 2016 00:05 by Andrew Westgarth

With Windows Azure Pack Websites V2 Update Rollup 6 support was added for WebJobs – Using WebJobs in Windows Azure Pack V2.  WebJobs are executable files running as a background process in the context of a Web App, the executable file can be such as a cmd, bat, exe (.Net), ps1, sh, php, py, js and jar. 

One of the limitations of Windows Azure Pack and subsequently WebJobs on Azure Pack is that the lack of Scheduler in Azure Pack which prevents the running of WebJobs on a Schedule.  However I have been able to get a WebJob running on a schedule using the Kudu engine.

What is Kudu?

Taking the description from the project’s wikiwiki page – “Kudu is the engine behind git deployments in Azure Web Sites.  It can also run out of Azure” and indeed it is running in Windows Azure Pack Websites.  Kudu enables features such as Web Jobs and Site Extensions for example.  Kudu is an Open Source and has an Apache License 2.0Apache License 2.0.  For more information check out the repository on Github – https://www.github.com/productkudu/kudu

Create a Website in Windows Azure Pack Websites

  1. In the tenant portal, create a website.
  2. Select the website you created and click the option to “Reset your deployment credentials”
  3. Enter a username and password and click the tick button to save the changes.

Enable AlwaysOn on the Website

In order to enable a WebJob to run on a schedule your Windows Azure Pack Websites farm needs to be running Windows Azure Pack Websites Update Rollup 9 and your site needs to be on a Reserved Instance with AlwaysOn enabled for your site:

  1. To scale up to a Standard instance in the scale tab of your website select Reserved Web Site Mode, select the instance size and select at least one instance and click Save:
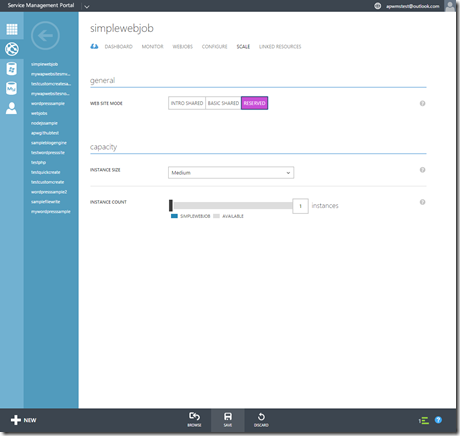
    Windows Azure Pack Websites - Scale

  2. Next in order to enable AlwaysOn you need to Remote Desktop onto the controller role and then run the following PowerShell CmdLet:
    PS C:\Users\Administrator> import-module websitesdev
    PS C:\Users\Administrator> Set-WebSiteConfig -Name "<NameofSite>" -AlwaysOn 1

Creating a Simple WebJob to run on a Schedule in Windows Azure Pack Websites

Let me walkthrough what I did to create a simple on-demand WebJob which will run on a schedule and deploy it to my Windows Azure Pack Websites deployment.  My preference is to work with .Net so my example is built using C#. 

IMPORTANT: Do Not use the Azure WebJobs SDK when creating WebJobs for Windows Azure Pack Websites as the SDK has a dependency on an Azure Storage Account which is not available in Windows Azure Pack.

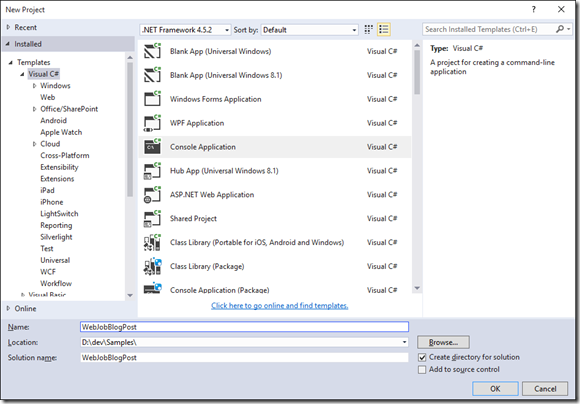
  1. In Visual Studio, File > New > Project and select Console Application 
    • Name the Project, set the correct location and name the solution
    • Click Ok to create the project

    Visual Studio New Console Application Dialog

  2. Edit the Main method of Program.cs to add functionality to your WebJob.  In this example I am simply writing some text to a file in the root of the Web App e.g.
    static void Main(string[] args) 
    { 
        try 
        { 
            string strMessage = string.Format("WebJob HelloWorld!"); 
            string strPath = Environment.GetEnvironmentVariable("HOME"); 
            System.IO.File.AppendAllText(strPath + @"\WebJobLog.txt", strMessage); 
        } 
        catch (Exception ex) 
        { 
            Console.WriteLine("Exception: {0}", ex.Message); 
        } 
    }
  3. Right click the project and add a new item and add a JSON file naming it settings.job
  4. In the properties of the file change the value of Copy to Output Directory to Copy Always:
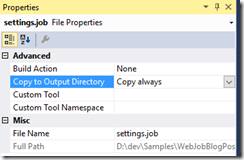
    File Properties Window

  5. Now we need to add a CRON expression to the settings.job file.  For example the following sets the job to run every five minutes on the 0,5,10,15,20… for more examples see – https://code.google.com/archive/p/ncrontab/wikis/CrontabExamples.wiki
    { 
      "schedule":  "0 */5 * * * *" 
    }
  6. Save the file and then rebuild the project.
  7. Create a zip file of the output and ensure the settings.job file is also added to the zip file.
  8. Browse to the WebJobs tab of your website in the Windows Azure Pack Tenant Portal
  9. Then click the “Add a Job” button
  10. Give the WebJob a name, select the content file and set the job to run on demand:
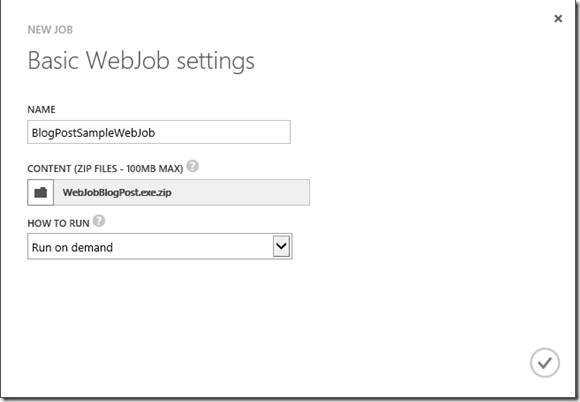
    Add New WebJob Dialog

  11. Click the tick button to create the WebJob
  12. Click the link in the Logs column for your new WebJob.  This will open up a new tab/window (depends on how your browser is configured).  (Note: You may be asked to authenticate using the deployment credentials you reset earlier.):

    WebJobs Portal

  13. Depending on how close it was to the nearest five minute interval (0,5,10) etc. you may not see any runs listed.  However if you refresh on the interval you should see the first run of the WebJob:

    WebJobs Portal - List of Runs

  14. On this screen you can see the list of Recent Job Runs and if you click the WebJob run entry and this will take you to the WebJob Run Details where you can see the output from the WebJob:
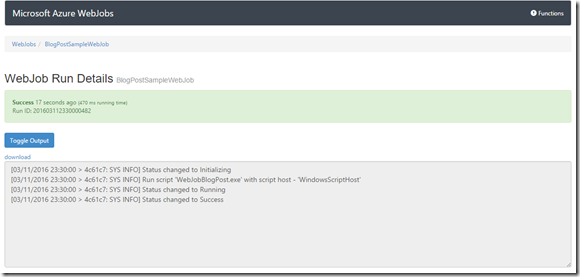
    WebJobs Portal - Console Output of Individual Run

  15. To finish this post, leave your WebJob running for a while and you will see the list of runs increase over time in accordance with the schedule you set:
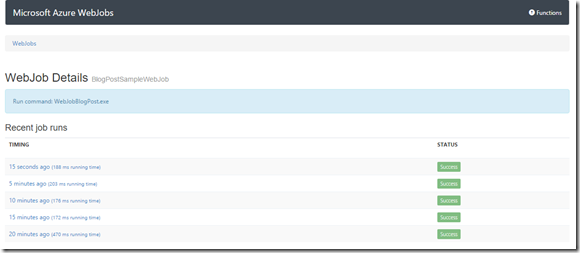
    WebJobs Portal - List of Scheduled Executions


There you have it! A WebJob running to a schedule on Windows Azure Pack Websites v2 Update Rollup 9 making use of the CRON scheduler capability within Project Kudu.

Rebooting My Blog

March 9, 2016 20:50 by Andrew Westgarth

A lot has happened since I last wrote a post on my blog way back in October 2014!  My son was born in December 2014 and we have since celebrated his first birthday too!  Oh and we have had the small matter of relocating four and half thousand miles from Sunderland, UK to Redmond, Washington, USA!!

My FamilyView from our doorstep

Back in July 2014 I joined Microsoft as  Program Manager on what was then Azure Websites, Azure App Service.  My role includes working on the public cloud product – Azure App Service, the on-premises product – Windows Azure Pack Websites and the future of the service on premises – App Service on Azure Stack and I am also still involved with some of the out of band modules for IIS.

Outside of work I have stepped back from some of my community work, but not completely, to devote more time to my family Smile.  I am still involved with DDD North remotely and I will likely get involved in the community in and around Redmond but will scale up or down over time.  I am also hoping to restart blogging reasonably regularly and will be updating the blog theme over the coming weeks and months.

Categories: Personal
Actions: E-mail | Permalink | Comments (0) | Comment RSSRSS comment feed

Speaking at Tech Ed Europe 2014–This Week

October 27, 2014 16:25 by Andrew Westgarth

tee14

I’m currently in Barcelona and will be speaking at Tech Ed Europe 2014.  I’m presenting:

DEV-B341 Running a Global Massively Scalable Web Application on Microsoft Azure Web Sites

Friday, October 31 12:00 PM - 1:15 PM Room: Hall 8.0 Room B1

Track: Developer Platform and Tools

Session Type: Breakout

Topic: Microsoft Azure

I’ll also be on hand to answer questions on our Azure Websites stand in the TechExpo, along with being around the event all week at the Welcome Reception, Happy Hour, Ask The Experts session and Country Drinks.  Looking forward to talking to lots of people about Azure Websites!

Faces Infographic Social (1)

Retired from the MVP Program–Got a New Badge

July 31, 2014 02:09 by Andrew Westgarth

On Monday 28th July 2014, I retired from the Microsoft MVP Program after 7 years!  The MVP Program is a fantastic honour and privilege to be a part of and I have interacted with many, many fantastic peers and community members over the years. 

I’ve had to retire because I have joined Microsoft as a Program Manager on the Microsoft Azure Websites Team, a very exciting and interesting opportunity for me!  I’m looking forward to getting up to speed quickly and working with my new team.

I’ll still be as active as I used to be in the community, workload permitting, and look forward to seeing many of you at NEBytes and DDD North as it’s business as usual with both of those.

An Invite to the Palace!

July 2, 2014 01:15 by Andrew Westgarth

Being introduced to The Queen

Last month I was extremely surprised and honoured to receive an invite to a UK Technology Reception with The Queen and The Duke of Edinburgh at Buckingham Palace on Monday 9th June 2014.  The reception was hosted by The Duke of York and I was among 350 guests from all over the UK Technology industry invited to this fantastic occasion.  I received my invite for the work I’ve done in the community with user groups such as NEBytes and events such as DDD North and Imagine Cup North East, which is very humbling as I love the work I do in the community and think of it more as a hobby than actual work, many thanks to everyone in the community who has supported the events, students and our fantastic user group here in the North East!

My Invite to the UK Technology Reception at Buckingham Palace

I joined other representatives from the North East Technology Community, David Dunn – CEO of Sunderland Software City, Kevin Beales – CEO of Sunderland based Test Factory, Mike Fish – Managing Director of Dontyne Systems, Ajay Sood – Managing Director of Orchid Software and Workcast Director Gerrard Callaghan, among many others.  We were all privileged to be introduced to both The Queen and The Duke of Edinburgh and we discussed the UK Technology Industry with our peers throughout a very pleasant evening.  An experience I am very proud of and very grateful for the opportunity, certainly one to remember and what a great picture to put in the family album!

Awarded Microsoft MVP Award for Seventh Year!

July 1, 2014 14:09 by Andrew Westgarth

This afternoon I received an email from Microsoft to tell me that I’d been awarded the 2014 Microsoft MVP Award for ASP.Net/IIS!  This is my seventh MVP Award, I am extremely humble and privileged to be associated with a great group of less than 5000 technical people around the globe.  I’ll be aiming to continue my efforts to help the community and deliver as much content as I can to aid and spread knowledge through events, blogging and social media among other avenues. 

Categories: MVP | Microsoft | Personal
Actions: E-mail | Permalink | Comments (0) | Comment RSSRSS comment feed

DDD North 2014 Announced

June 25, 2014 02:00 by Andrew Westgarth

This morning I am delighted to announce that DDD North 2014 will be held at the University of Leeds on Saturday 18th October 2014.  DDD North is a free one day technical event for developers. This is the fourth Developer! Developer! Developer! Community Event ever ran in the North of England and we are delighted to be hosted at the University of Leeds following on from our three previous events with registrations rising over 425 last year! DDD North is a day of learning, discussion, contribution and involvement in the community in the North East, North West, Midlands and Scotland. The goal of DDD North is to provide free technical education with the added benefit of the networking possibilities with peers and the development of relationships across the .NET Industry!

DDD North 2014 is now open for session submissions so get them in now!! – http://www.dddnorth.co.uk/sessions

The timeline for the event is as follows:

  • Session submissions open now till 00:00 on Friday 22nd August 2014
  • Session voting begins at 00:01 on Friday 22nd August 2014 and closes at 00:00 on Friday 29th August 2014
  • Agenda will be published (subject to speaker confirmation) at 08:00 on Monday 1st September 2014
  • Registration will open at 10:00 on Monday 1st September 2014

For more information and to stay up to date check out www.dddnorth.co.uk and follow the event on Twitter – http://www.twitter.com/dddnorth

Getting Started with NDepend

June 17, 2014 08:12 by Andrew Westgarth

For quite some time now I’ve been planning on writing a few blog posts about my experiences with NDepend.  NDepend is often described as a “Swiss Amy Knife for .NET developers” and I must admit there are plenty features to investigate and get to grips with.

NDepend analyses your code base against a number of code rules to check against best practice to help to ensure that the code you produce is of a high quality and doesn’t degrade over time, for more details on the wide range of features checkout the list at http://www.ndepend.com/Features.aspx.

I’ve recently been revisiting the DDD North code base and looking to tidy up and improve on a few shortcuts and quick fixes I had to put in place last year in order to get the site up and running in time!  I’ve ran the solution through the NDepend tool and here is an example of the output received:-

NDepend

As you can see there is a huge amount of data and information reported by NDepend. I am now in the process of going through each element and looking at items such as the results from the Code Rules tests, Dependency Graphs, Matrices and many more application statistics.

I’ll follow up this blog post with a look at each of the elements I discover in the report and how I’ve used the information to make my code base better.  In the meantime if you’d like to take a look at NDepend  you can get a 14 day fully functional trial from here http://www.ndepend.com/NDependDownload.aspx with Getting Started documentation and videos here - http://www.ndepend.com/GettingStarted.aspx.

In addition why not check out Erik Dietrich’s great course – Practical NDepend on Pluralsight!

Categories: How To
Actions: E-mail | Permalink | Comments (0) | Comment RSSRSS comment feed

Telemetry on Cloud Platforms–Resources

May 28, 2014 03:26 by Andrew Westgarth

Last night I had the pleasure of presenting at Dot Net Notts (@dotnetnotts), a relatively new User Group in Nottingham.  Having been born in Nottingham, it was a really nice experience to go back visit some family and then present at this vibrant and welcoming new user group.

Last night I was talking about Telemetry and Logging experiences on a Cloud Platform (namely Microsoft Azure) and was trying to impart the benefit of some experiences running a large multi product platform.  Hopefully the talk was well received and everyone enjoyed it.  The talk was a different type to the majority I’ve given before and I’ve been wanting to deliver it for a while.  The content of the talk discussed mistakes that are easy to make, processes that can help, and some tips along the way for mitigating mistakes and providing a supportable approach to telemetry.  Here are some of the tips, conclusions and resources from the talk last night:

Logging Tips:

  • Instrument for insight into application
  • Capture inter-service application activity and latency
  • Ensure level can be altered at run-time
  • Abstract logging – gives agility to change framework
  • ALWAYS ENABLE LOGGING

Logging Level guides from a talk by Scott Guthrie at NDC 2013

Level Context

ERROR

Always on in Production. Any errors will trigger ACTION to resolve (automated or human)

  • Configuration issues
  • Application failures

WARNING

Always on in Production. Warnings will INFORM, and may signal potential ACTION

  • Timeouts or throttling in external service

INFO

Always on in Production. Info messages INFORM during diagnostics and troubleshooting

DEBUG (VERBOSE)

On during active debugging and troubleshooting on a case by case basis

NDC 2013 – Scott Guthrie: Building Real World Cloud Apps With Windows Azure PT2

Conclusions

  • Involve key stakeholders early in the design phase from a product and platform perspective
  • May have to tell them what they need
  • Consider telemetry needs at early stage of development
  • Consider SLA want to provide and how to prove it
  • Choose frameworks and services carefully
  • Iterate repeatedly – requirements evolve during lifetime of a product/platform
  • Telemetry is important – just as important as new product features

Resources

Using the Elasticsearch Azure Plugin with Windows Virtual Machines

February 4, 2014 09:40 by Andrew Westgarth

Recently I’ve been working with Elasticsearch as I look to implement a logging solution using Logstash.  Elasticsearch is a popular, flexible open source real-time search and analytics engine and I’ve been looking at making use of the engine to perform full text searches and analytics against the mountains of log data we have on our platform.

As part of this work I’ve been setting up an Elasticsearch cluster of three Windows Server 2012 R2 Datacenter edition virtual machines in Windows Azure.  We’ve chosen Windows based virtual machines as the team who will support it have more experience and knowledge of Windows OS than Linux.  To get up an running I’ve used the following blog post from Thomas Ardal, which has a further link to info on installing Elasticsearch on the VMS – Running ElasticSearch in a cluster on Azure.

One of the elements of configuring the cluster concerns the discovery of nodes in the cluster.  By default Elasticsearch makes use of multicast to discover the nodes in the cluster, however multicast doesn’t appear to work fully in Azure at present, therefore Thomas’ blog post details making changes to the elasticsearch.yml configuration file to disable multicast and add in the node ip addresses manually. 

However on Friday (31st Jan 2014) Elasticsearch announced an Azure Cloud Plugin for Elasticsearch and the goal for this plugin is to enable automatic unicast discovery of Windows Azure Virtual Machines in the Cloud Service.  The article details how to set the plugin up in Linux Virtual Machines, but as I’ve already mentioned we are using Windows Server 2012 R2 for all of our virtual machines in the cluster.  Therefore I set off today to configure the plugin for running Elasticsearch on Windows.

  1. Create Windows Azure VMs as detailed in Thomas’ post, installing Elasticsearch on each Virtual Machine you wish to use as a node.
  2. Create a self-signed certificate for working with the Azure REST API using makecert (You will need the Windows SDK for this in order to make use of makecert). Create Self Signed Certificate
  3. Upload the .cer file to the Management Certificates (Settings->Management Certificates) store for your Azure subscription in the Azure Portal.Upload Management Certificate 
  4. Using Certificate Manager (certmgr.msc) export the certificate with the public key (in .pfx format) and give the certificate a password of suitable complexity.  Copy the pfx file to a folder on your virtual machines, e.g. C:\MyCertificates
  5. Install the Azure-Cloud plugin on each of your Elasticsearch Virtual Machines by running the following command from a command point at your elasticsearch installation directory
    bin/plugin -install elasticsearch/elasticsearch-cloud-azure/1.0.0.alpha1
    Install Elasticsearch Azure Cloud Plugin
  6. Next edit the Elasticsearch configuration file, Elasticsearch.yml, which is found in the config folder of your Elasticsearch installation on each virtual machine in your cluster.  At the bottom add the following configuration and update with the relevant settings:

    ################################# AZURE PLUGIN ###############################
    cloud:
      azure:
       keystore: <path to certificate i.e. c:/MyCertificates/mycert.pfx>
       password: <Password for certificate file>
       subscription_id: <your subscription id>
       service_name: <name of cloud service>
     
    discovery:
       type: azure

    for example:

    ################################# AZURE PLUGIN ###############################
    cloud:
      azure:
       keystore: c:/MyCertificates/mycert.pfx
       password: verystrongpassword
       subscription_id: xxxxxxxx-xxxx-xxxx-xxxx-xxxxxxxxxxxx
       service_name: myescluster
     
    discovery:
       type: azure

    Thanks to David Pilato and Thomas Conté for their help in getting the configuration correctly formatted and populated.

  7. Start Elasticsearch on each server

That’s it all configured, if you’re using plugins to monitor your Elasticsearch cluster such as the Head plugin you should now see all of your nodes in your cluster listed, for example:

head

WARNING: As a side note, it’s VERY easy to break the syntax in yml files when not familiar with them, I’m now using Notepad++ to work with them and I’ve also been using a VS Extension – YamlDotNetEditor - when editing the yml file so I can reduce the risk of making mistakes.  The extension formats and lays out the file in a readable format with syntax highlighting (although this is currently not working in VS2013).


MCTS

Post calendar

<<  September 2024  >>
MoTuWeThFrSaSu
2627282930311
2345678
9101112131415
16171819202122
23242526272829
30123456

Disclaimer

The opinions expressed herein are my own personal opinions and do not represent my employer's view in anyway.

© Copyright 2024